Prince Armory Tools of the Trade # 1
I am starting a new mini series called Tools of the Trade. I don’t yet have the time to promise a weekly schedule, nor to offer great production value but hey, it’s free right? The content will not necessarily be a how-to leather working guide as this topic will be covered in other series, instead I want to just talk about the tools themselves. This will be a short blog to get some momentum going but eventually I expect to add video and audio content discussing these things in greater detail but ultimately most of what I put out will be shaped by you guys. Whatever I see doing well in terms of likes, shares, and engagement is what I’ll likely focus on in the future. I don’t expect to put up ads or anything like that so if you like the content, be sure to share it with your friends and get the word out.
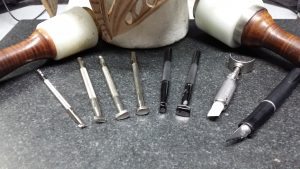
Tools used for making the leather helmet visor on the Krypton armor.
Welcome to Tools of the Trade where I discuss the tools that were used for a particular project or piece and how they were used and more.
In this blog I will be talking about the helmet visor piece made the Krypton themed armor currently underway at the prince armory shop. The armor itself is a derivative work based on Jor El’s Kryptonian armor, and while some elements may be familiar it is not billed as a replica.
In this first blog I simply have some Work In Progress pictures of the piece and I’ll follow up later with a pic of the complete piece.
From left to right I will describe the tools pictured here and what impact they have upon the final product.
- Small tapered maul – Used for striking the leather stamping tools lighter weight allows for greater fineness and faster repetitive strokes. The taper of the maul face is a preferential or ergonomic feature. Mauls often scare people away for seeming to require more accuracy but this is not really the case, sort of, but not really. Consider for a moment what happens if you do not strike with a normal broad faced mallet in the center – the momentum of an inaccurate strike carries the mallet soundly down onto your fingers and can jettison your stamp in flying glory across the room.
Also, 100% of a maul’s face is a viable striking surface. Mallets, rawhide mallets especially, concentrate all blows into a small ‘sweet spot’ accounting for about 10% of the actual head causing you to have to resurface the head by grinding it down every so often. I don’t mind using mallets but for production work its just been a no-brainer to go with mauls. - Small backgrounding texture tool. This was used for just the small textured spots in the very center of the piece. This is a common tool from Tandy, there are many like it that give similar effects. I don’t see any real need to give the specific item number as I’m looking to explain the general purpose, use, and why of certain tools I use here in the shop and on my projects. The point in fact is really that it could have been any tool of this nature, so its best to understand the general purpose and not to get fixated on any particular tool and select something you think will look good for your own project, not just what I’ve done here.
- Small Pear Shader
- Medium Pear Shader
- Broader Medium Pear Shader – So the pear shaders are tools used to sort of sculpt shape into the leather via repetitive stamping of varying pressures. These are smooth faced and there are many other sizes and textures out there but these served my purpose here. The effect achieved by using this is predominant through this piece in the organic looking texture surrounding the filigree and any concave form in the design. The process is probably best demonstrated by video but in simple terms, one ‘walks’ the tool using numerous strikes to leave impressions in the leather. Many strikes are needed, as well as some control, to leave a smooth impression behind, and not chunky ‘chatter’.
- Medium Beveler
- Wide Beveler – These two examples are made by Robert Beard and often referred to as ‘Black Crack’ these are a couple examples of some of the best leatherworking stamps a person can own, I love them. But to the purpose at hand, these create the impressions along the borders and lines. As the tool implies, it simply bevels the edges of a line. Like the pear shader, numerous strikes while walking the tool are required to leave a good impression. A beveled line can often benefit from another pass to clean up chatter but the wider beveler does clean work on broad lines where the more narrow tool is necessary for sharper curves and tight spots.
- Swivel Knife – when it comes to decorating leather this is fairly essential. There are other ways to create lines and decorations but this is certainly the most common. You can use it to create just cut lines alone, but its also the starting point of many tooling processes. It is a sharp tool and does actually cut into the leather, but it is a very wide blade so it does not cut all the way through. One can vary the line thickness by varying pressure. There is more to be said about its use and even how to hold the thing so I’ll leave it at that. You can find some examples of swivel knife carving in our Facebook videos.
- Exacto knife – I used this to cut the filigree out. There are other ways to do it but this way is pretty straight forward, just take care not to cut too much out and keep your lines smooth.
- Heavy Maul – Another maul, just heavier. The extra weight makes deep embossing/beveling a breeze.
So that’s it for this one. Remember I will go into greater depth into processes and how to’s in other guides. If you like what you read here and want to see more be sure to tell us about it. Like our page and share it with your friends.


5 Comments
Comments are closed.